Successful recovery from a torn ACL begins before reconstruction surgery. Long-term ACL research clearly shows the stronger and more functional your injured knee before surgery, the further ahead you’ll be in your rehabilitation after.
What you do before surgery is referred to as prehabilitation or just prehab. The MOON Knee Group recommended prehabilitation exercises on this page will:
- Strengthen your muscles
- Increase your range of motion
- Increase blood flow around your knee to promote healing.
Pre-ACL Surgery Goals
The two most critical goals before and after ACL surgery are to:
- Work toward being able to fully straighten (achieve full extension) of your injured leg
- Walk normally
Other pre-surgery goals are to:
- Minimize pain
- Reduce swelling
- Develop good quadriceps control and strength
The exercises on this page will help you work toward these goals. These exercises are also used in the Phase 1 rehabilitation program that begins immediately following surgery. (See this chart for which exercises are recommended in prehab through Phase 3.)
Evidence-Based ACL Rehabilitation
The evidence-based MOON Knee Group anterior cruciate ligament post-surgery rehabilitation program has five phases plus prehabilitation. Each has specific goals, exercises and instructions based on two decades of research.
Success depends on completing each phase before moving on to the next. Your physician, physical therapist or athletic trainer will measure your progress and instruct you on when to advance.
ACL Prehabilitation Guidelines
If you’ve torn your ACL, it is normal to experience discomfort, swelling and bruising. Here are ways to manage the discomfort and swelling to prepare your knee for surgery.
Crutch Use
- You may be asked to walk with two crutches. Crutches help you protect your knee and get around safely.
- When using crutches, place as much of your body weight on your leg as you can without increasing knee pain while walking. You might hear this called weight-bearing as tolerated or WBAT.
- Your physical therapist or doctor will guide you on using crutches before and after surgery.
Ice, Elevate and Rest
If you’ve torn your ACL, the recommendation is to ice, elevate and rest your knee to control swelling, inflammation and pain.
- For at least the first 24 hours after your injury or until severe inflammation is controlled, ice and elevate your leg at a level above your heart while lying down.
- Elevate and support your entire leg. Do not place a pillow or other support under your knee alone.
- If your medical professionals recommend compression, please ask them for specific instructions for use in your recovery.
Regain Mobility and Strength
The recommended exercises include ones to improve your mobility and ones to improve strength. Doing at least the primary exercises in both areas is important for successful rehabilitation.
Primary, Alternate and Optional Exercises
If you’ve injured your ACL, you might not feel like moving your knee. However, keeping knee motion and working toward full leg extension (straightness) are important in preparing for surgery and successful recovery after.
The MOON Knee Group ACL rehabilitation exercises are designed to move you step by step. Exercises are identified as primary, alternate and optional.
- Primary exercises are the minimum recommended for achieving a successful recovery.
- Alternate exercises achieve the same objective as primary exercises. Use these if your body is uncomfortable in the primary exercise position.
- Optional exercises provide additional strength and conditioning.
Consult with your medical team about which exercises are advisable for you, particularly if you experience increased pain and swelling.
Pre-Surgery ACL Mobility Exercises
Gaining full knee extension (straightness) is a critical goal before surgery and in Phase 1.
PRIMARY Everyday Knee Extensions
- When resting, sitting or lying down, extend your surgical leg in front of you.
- Straighten your leg as much as you can with your knee straight up.
- Allow gravity to gently continue to straighten your knee.
- Do this for 20-30 minutes three to four times a day.
Also every day: perform the supine or prone knee extensions below before and after your heel slide mobility exercises.
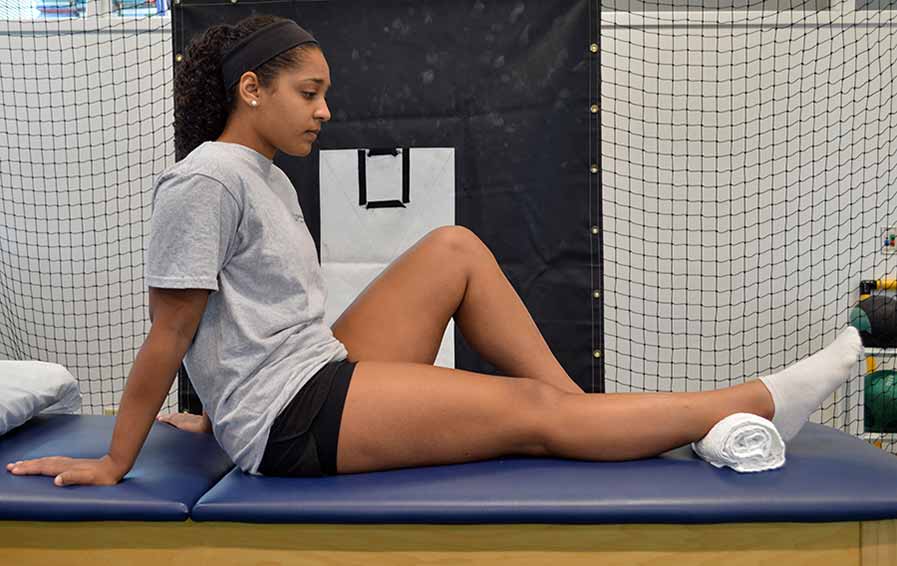
PRIMARY Supine (on Back) Knee Extensions
- Lie on your back with your knee straight.
- Place a small towel roll under your heel (not your knee) and hold that position for 20-30 minutes three to four times each day.
ALTERNATE Prone (on Stomach) Knee ExtensionS
- Lie on your stomach with a small flat towel roll just above your knee on the thigh.
- Let your foot hang off the end of the bed or table for 20 -30 minutes three to four times each day.
Alternate Seated Passive-Assisted Knee ExtensionS
- Seated in a chair place the foot of your nonoperative leg under the knee surgery leg behind the foot.
- Gently use your good leg to lift your surgical leg out as straight as possible while keeping your surgical leg relaxed.
- Return to the starting position.
- Repeat 10–20 times two to three times each day.
PRIMARY Heel Slides—Knee Flexion and Extension
- Lie on your back or sit and bend the knee ensuring the foot stays in contact with the floor or surface.
- Slide the foot to straighten the knee to keep it mobile and try to improve your range of motion.
- Slight discomfort may be felt but stop if there is pain.
- Repeat 10 to 20 times. Repeat the set three to four times a day.
PRIMARY Ankle Pumps
- Lie or sit with your legs out straight with a towel roll under your ankle.
- Bring your toes up and then back down like you’re lifting on and off a gas pedal.
- Complete 15 repetitions every hour.
Pre-Surgery ACL Mobility Exercises
Pre-Surgery ACL Strength Exercises
PRIMARY Quadriceps Set
The Quadriceps Set is vital in restoring your quadriceps strength. It is also the foundation for many other exercises as you progress. Focus on correct muscle activation (tense and then relax) and technique.
- Start on your back or sitting with your legs out straight.
- Next tighten the top of your thigh so you are pushing your knee flat against the surface. This tightening should cause your knee cap to move toward your hip.
- Focus on the quadriceps, not your gluteal (butt) muscle or hamstrings. If you feel those engaging, pause, reset and refocus on contracting the quadriceps.
- Hold the muscle tight for five seconds.
- Complete 12 repetitions, three times per day.
Hamstring Sets
You have four hamstring muscles along the back of each thigh. These help control the knee with many activities including walking and stairs. Restoring hamstring strength is just as important as it is for the quadriceps on the front of your thigh. These two hamstring sets help improve muscle activation on the back of your thigh.
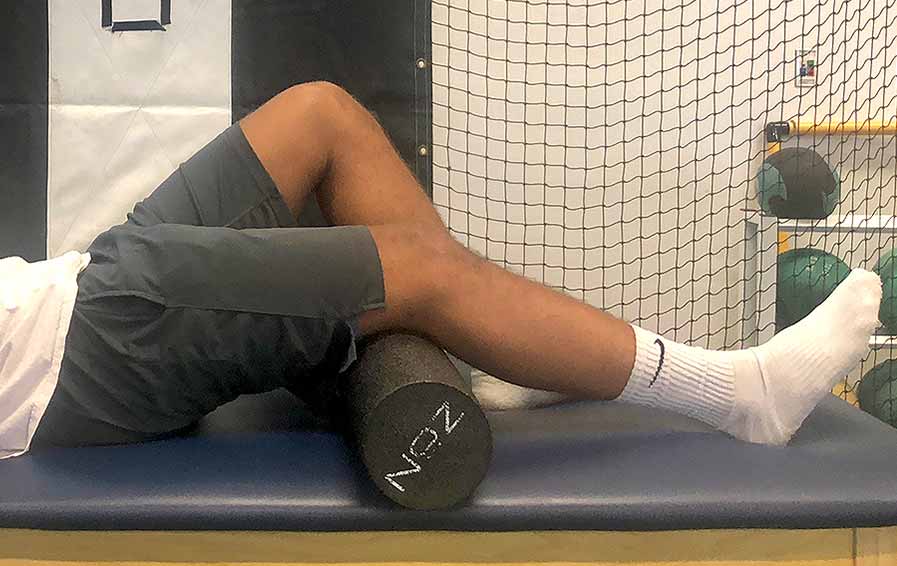
PRIMARY Hamstring Set While on Your Back
- Lie on your back and bend your knee to bring your calf to 90 degrees.
- Push your heel down into the surface with mild to moderate pressure.
- Hold for six seconds, then relax.
- Perform 12 repetitions one to three times per day.
ALTERNATE Hamstring Set On Your Stomach
- Lie on your stomach with a towel under the front lower part of your thigh.
- Bend your knee to bring your calf up to 90 degrees from the table or floor.
- Perform 12 of these, one to three times per day.
ALTERNATE Hamstring Set Standing
- Stand on both feet with both crutches.
- While supported by the crutches, perform a gentle hamstring curl, bending your knee upward behind you.
- Hold for six seconds, then relax.
- Perform 12 of these, one to three times per day.
PRIMARY Hamstring/Quadriceps Co-Contraction
Hamstring and quadriceps co-contraction will help activate (tense and then relax) both these muscles together. This is important for walking, taking stairs, standing up and sitting down.
- Lie on your back with your operative leg out straight. (You may bend your nonoperative leg up to 90 degrees for comfort.)
- Push your heel down into the table like you’re trying to “dig.” Once you have these muscles contracting, tighten your quadriceps muscle by trying to straighten your leg. Push firmly but not so hard you lift your body off the table.
- Hold this contraction of both sides of the thigh for five seconds, then relax.
- Complete this exercise 12 times three times per day.
PRIMARY Straight leg raises (Avoiding quad lag)
Straight leg raises (SLR) let you continue to develop quadricep strength and function for return to walking and daily activities. Begin these after you’ve made progress with quadriceps sets and can perform a straight leg raise. It will be a main exercise in your postoperative rehabilitation.
Focus on working the correct muscles.
- Lie on your back with your nonoperative leg bent to 90 degrees.
- Push the knee of your operative leg flat against the surface to tighten the top of the thigh.
- Hold the thigh muscle tight. Lift your leg until your knee reaches the height of your other knee. Use a slow and controlled motion.
- Keep your knee as straight as possible to prevent “Quad Lag.” Lag is when your knee bends slightly as you start to lift your leg.
- Focus on using the quadriceps muscles and NOT your hip. Hold the muscle tight during the entire motion.
- Keep your knee in line with your shoulder. This will direct more of the force toward your quadriceps muscle.
- Return your leg to the surface slowly. Relax and then retighten the muscle and perform another repetition.
- Complete 12 repetitions three times per day.
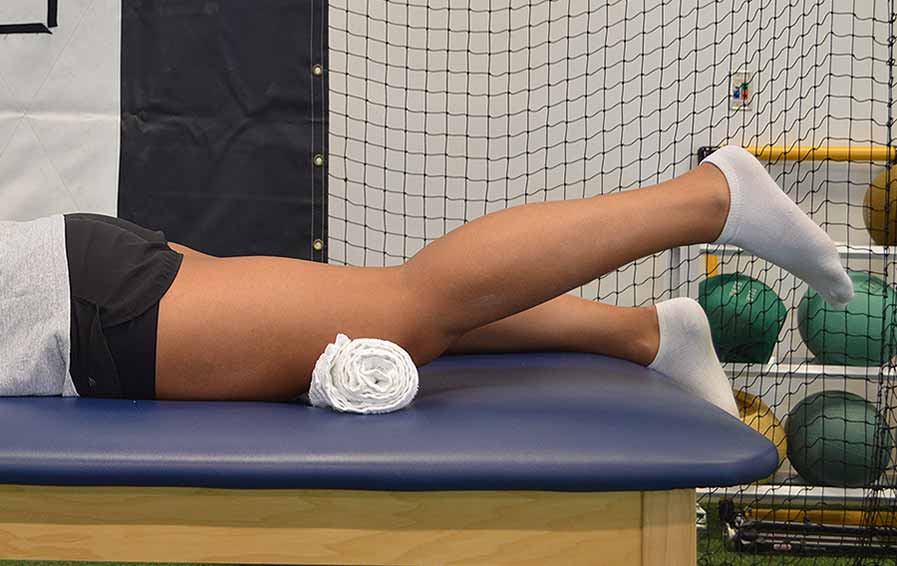
PRIMARY Prone Straight Leg Raises
Prone straight leg raises strengthen your hip and gluteal muscles. This will help with daily activities. Perform this exercise lying on your stomach.
- Lie on your stomach with your legs about shoulder-width apart.
- Tighten your core abdominal and gluteal muscles.
- Lift just your operative leg off the table. Keep the muscles in your other leg as relaxed as possible.
- If you notice increased effort in your nonoperative leg, move it further from your body. This will increase the load on your operative leg.
- Lift your leg as far as you can and hold for two seconds.
- Slowly lower your leg.
- Do NOT rotate your hips or arch your back.
- Complete this exercise 12 times three times a day.
If you notice increased lower back pain, place a pillow under your abdomen. This helps reduce back stress and improve gluteal muscle use. Remove the pillow once you get stronger.
ALTERNATE Standing Hip Extensions
Standing hip extensions increase your ability to bear weight on your operative leg while walking. They also strengthen muscles around your hip.
- Stand tall with your hands on a stable surface for support.
- Shift your weight onto your nonoperative leg.
- Maintain an upright position. Lift the non-stance leg slightly and move it back. Do not let your pelvis and trunk rotate.
- Hold for two seconds and then slowly return to the starting position.
- Complete this exercise 12 times on each leg three times per day.
- Add a resistance band as your strength improves with the approval of your physician, physical therapist or athletic trainer.
Do this exercise with a smooth and controlled movement.
ALTERNATE Prone Hamstring Curls
Perform prone hamstring curls on your stomach for strengthening and to improve range of motion (the ability to bend your knee).
- Lie on your stomach. You may want a towel roll or pillow under your thigh for comfort when moving your knee.
- Bend your operative knee to move your heel up toward your back. Perform this motion slowly and deliberately.
- Hold this bent-knee position for five seconds.
- Slowly lower the foot back down to the table slowly (over two to three seconds).
- Perform 12 repetitions three times per day.
PRIMARY Double-Leg Heel Raises (calf press)
Heel raises improve calf strength. This will help you walk and, later in your rehabilitation, jump and run.
- Stand with your hands on a table or other stable surface for support.
- Place your feet shoulder-width apart.
- Keep your weight the same on both legs.
- Keep your toes on the ground and lift your heels using a two-second count.
- Hold this position for a short period, then lower slowly for four second
- Complete the exercises 12 times one to three times per day.
Make sure your motion is vertical. Do not rock forward or use your arms to lift you.
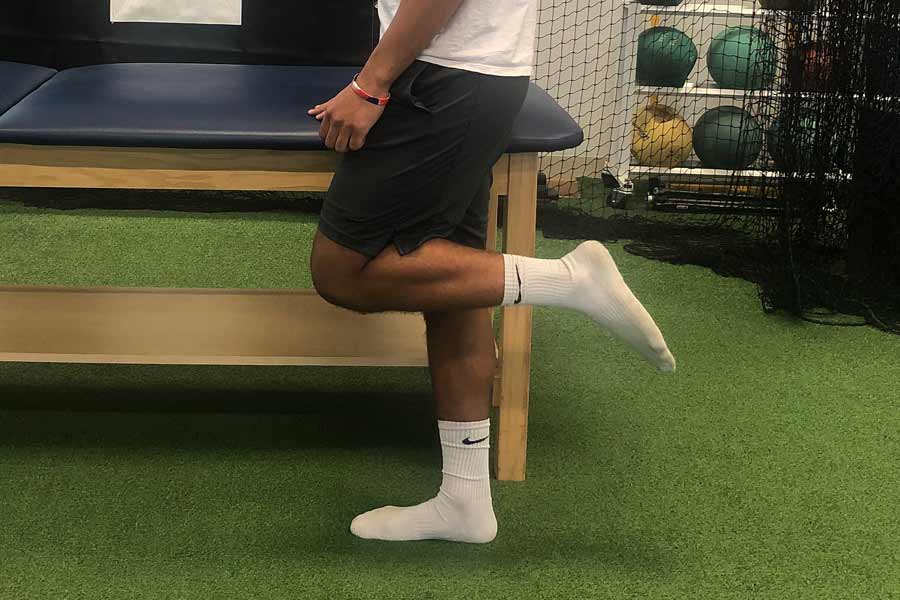
OPTIONAL Standing Hamstring curls
Once you are comfortable performing prone hamstring curls and can bear weight (stand) on your operative leg with control, standing hamstring curls can improve hamstring strength.
- Stand with your hands on a stable surface for support.
- Maintain an upright position. Shift your weight slightly to the uninjured leg. Try not to lean.
- Bend your knee of your other leg to bring your heel up toward your back.
- Hold for five seconds.
- Slowly lower to the starting position.
- Complete sets of 12 times one to three times a day.
It is important to feel the muscles working in the back of your thigh. Your body might try to compensate by moving the hip up. Limit this by keeping the correct starting position and following the instructions.
PRIMARY Double-Leg Quarter Squats
Double-leg quarter squats provide an important transition to strengthen further your quadriceps, gluteal muscles and hamstrings. They also enable you to improve weight-bearing movements through your knees.
There are multiple important steps to this exercise. Avoid having non-targeted muscles perform the workload (called compensation). This will help you achieve your goals more efficiently.
- Stand with your feet shoulder-width apart
- Place your hands on your waist.
- Bend slightly at your hips, then at your knees.
- Lower your buttocks down about six inches as if you were going to sit in a chair.
- Straighten your legs and hips to return to standing.
- Keep your weight evenly on both legs. Avoid shifting weight to the nonoperative side.
- Keep your trunk straight and limit any tilt forward. Aim to keep the middle part of your knees over your second and third toes without letting your knees go forward beyond your toes.
You might find it useful to do these squats in front of a mirror. This will show you whether you’re keeping weight evenly on each leg.
PRIMARY Side-Lying Hip Abduction
Side-lying hip abductions improve muscle strength in the side and the back of your hip. This helps you walk. Follow the instructions and cues carefully to improve exercise effectiveness.
- Lie on your nonoperative side.
- Straighten your top (operative) leg and keep it straight throughout the exercise.
- Bend your bottom leg knee and hip in a comfortable position.
- Your first few times doing this exercise, consider placing two to three pillows between your knees at the starting position. This takes stress off the side of the hip. Once you’re stronger, you will no longer need the pillows.
- Important: bring the top leg slightly behind your trunk with your toes rotated in slightly. This further activates the muscle on the side of your hip.
- Lift your top leg using your hip, not your back or side.
- Lower your leg.
- Keep the hips aligned. Do not let your trunk rotate back.
- Complete this exercise 12 times one to three times per day.
OPTIONAL Side-Lying Hip Adduction
Side-lying hip adduction increases strength on the inside of your leg and improves function. It requires a good starting position.
Caution: If you have had an MCL injury or repair, do this exercise only with the approval of your surgeon and physical therapist.
- Lie on your side with your operative leg down.
- Extend your operative leg out straight.
- Pull the foot of your nonoperative leg toward you and place it down in front of your operative knee.
- Keep your trunk and hips stable.
- Lift your extended operative leg off the table. Keep it up and straight for two seconds.
- Slowly lower the operative leg down to the table.
- Complete this exercise 12 times three times per day or to your physical therapist’s recommendation.
Pre-Surgery ACL Strength Exercises
Was This Content Helpful?
Share via:
