ACL Tear Information
The World's Leading Resource for Improving ACL Injury Outcomes
You begin the second phase of your ACL rehabilitation when your physical therapist, athletic trainer or physician evaluates you and determines:
- You can extend your knee to within five degrees of fully straight even while active.
- You can bend your knee (flexion) to at least 110 degrees.
- Your quadriceps muscle is contracting with strength. For example, you can do 20 straight leg raises without difficulty.
This will be normally about two to three weeks after surgery. However, function, not time, is what matters!
Keeping full extension of your knee continues to be critical to your rehabilitation
Phase 2 Goals
- Progress your knee to full range of motion.
- Continue to improve muscle strength with increasing resistance in your exercises.
- Begin to resume your normal daily living activities. These include walking, standing, using stairs and getting in and out of a car.
Continue to Ice After Exercise
To control swelling, inflammation and pain after your exercise sessions, place a pillow under your entire leg—not just your knee—and apply ice to your knee for 15 minutes.
Primary, Alternate and Optional Exercises
MOON Knee Group ACL rehabilitation exercises are designed to move you step by step to complete recovery. The exercises are identified as primary, alternate and optional.
- Primary exercises are the minimum recommended for achieving a successful recovery.
- Alternate exercises achieve the same objective as primary exercises. Use these if your body is uncomfortable in the primary exercise position.
- Optional exercises provide additional strength and conditioning.
Consult with your rehabilitation team about which exercises are advisable for you, particularly if you experience increased pain and swelling.
On This Page
Evidence-Based ACL Rehabilitation
The evidence-based MOON Knee Group anterior cruciate ligament post-surgery rehabilitation program has five phases. Each has specific goals, exercises and instructions based on two decades of research.
Success depends on completing each phase before moving on the next. Your physician, physical therapist or athletic trainer will measure your progress and instruct you on when to advance.
Phase 2 ACL Strength Exercises
Alternate Seated Passive-Assisted Knee ExtensionS
- Seated in a chair place the foot of your nonoperative leg under the knee surgery leg behind the foot.
- Gently use your good leg to lift your surgical leg out as straight as possible while keeping your surgical leg relaxed.
- Return to the starting position.
- Repeat 10–20 times two to three times each day.
PRIMARY Quadriceps Set
The quadriceps set is vital in restoring your quadriceps strength. It is also the foundation for many other exercises as you progress. Focus on correct muscle activation (tense and then relax) and technique.
- Start on your back or sitting with your legs out straight.
- Next, tighten the top of your thigh so you are pushing your knee flat against the surface. This tightening should cause your knee cap to move toward your hip.
- Focus on the quadriceps, not your gluteal (butt) muscle or hamstrings. If you feel those engaging, pause, reset and re-focus on contracting the quadriceps.
- Hold the muscle tight for five seconds.
- Complete 12 repetitions, three times per day.
Hamstring Sets
You have four hamstring muscles along the back of each thigh. These help control the knee with many activities including walking and stairs. Restoring hamstring strength is just as important as it is for the quadriceps on the front of your thigh. These two hamstring sets help improve muscle activation on the back of your thigh.
ALTERNATE Standing Hip Extensions
Standing hip extensions increase your ability to bear weight on your operative leg while walking. They also strengthen muscles around your hip.
- Stand tall with your hands on a stable surface for support.
- Shift your weight onto your nonoperative
- Maintain an upright position. Lift the non-stance leg slightly and move it back. Do not let your pelvis and trunk rotate.
- Hold for two seconds and then slowly return to the starting position.
- Complete this exercise 12 times on each leg three times per day.
- Add a resistance band as your strength improves with the approval of your physician, physical therapist or athletic trainer.
Do this exercise with smooth and controlled movement.
PRIMARY Side-Lying Hip Abduction
Side-lying hip abductions improve muscle strength in the side and the back of your hip. This helps you walk. Follow the instructions and cues carefully to improve exercise effectiveness.
- Lie on your nonoperative side.
- Straighten your top (operative) leg and keep it straight throughout the exercise.
- Bend your bottom knee and hip in a comfortable position.
- Your first times doing this exercise, you might consider placing two to three pillows between your knees at the starting position. This takes stress off the side of the hip. Once you’re stronger, you will no longer need the pillows.
- Important: bring the top leg slightly behind your trunk with your toes rotated in slightly. This further activates the muscle on the side of your hip.
- Lift your top leg using your hip, not your back or side.
- Lower your leg.
- Keep the hips aligned. Do not let your trunk rotate back.
- Complete this exercise 12 times one to three times per day.
ALTERNATE Standing Terminal Knee Extension
Standing terminal knee extension improves quadriceps strength and walking. You’ll need an exercise band and stable item or partner to hold the band. This exercise is recommended for after surgery and is unnecessary before.
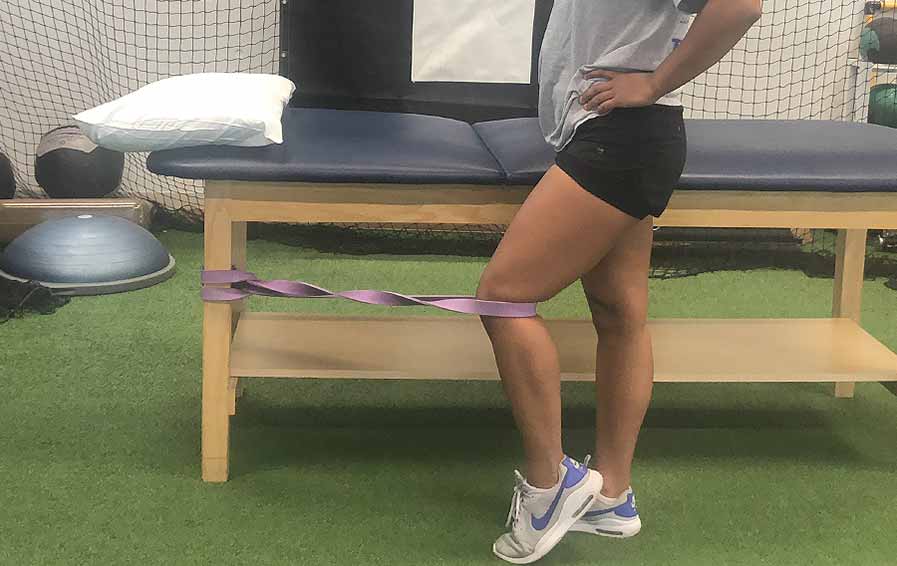
- Stand with the band around the back of your operative knee
- Attach the band to a stable item or have a partner hold the band securely.
- Begin with your knee slightly bent. Keep your heel and foot firmly on the floor.
- Keep your trunk upright. Straighten the knee using the quadriceps muscle.
- Hold for six seconds.
- Slowly return to the starting position.
- Complete two sets of 12 repetitions up to three times per day.
Phase 2 Strength Exercises
Phase 2 Functional Exercises
PRIMARY Straight-leg raises With resistance (Avoiding quad lag)
This exercise is a next step from quadriceps sets. The straight-leg raise is a great exercise to improve the strength and function of your quadriceps muscle to return to walking and daily activities. It continues to be a main exercise in your postoperative rehabilitation. While doing this exercise, focus on working the correct muscles.
- Lie on your back with your nonoperative leg bent to 90 degrees.
- Push the knee of your operative leg flat against the surface to tighten the top of the thigh.
- Hold the thigh muscle tight. Lift your leg until your knee reaches the height of your other knee. Use a slow and controlled motion.
- Keep your knee as straight as possible to prevent “Quad Lag.” Lag is when your knee bends slightly as you start to lift your leg.
- Focus on using the quadriceps muscles and NOT your hip. Hold the muscle tight during the entire motion.
- Keep your knee in line with your shoulder. This will direct more of the force toward your quadriceps muscle.
- Return your leg to the surface slowly. Relax and then re-tighten the muscle and perform another repetition.
- Complete 12 repetitions three times per day.
PRIMARY Standing Hip Flexion With resistance
This is a weight-bearing next step from straight leg raises. Standing hip flexion challenges your single-leg stability on the stationary leg and the strength of your hip flexors and quadriceps of your moving leg.
- Loop or tie an exercise band around a secure object like a table leg.
- Place one ankle inside the loop and step away until there is slight tension on the band.
- Stand tall and tighten the front thigh (quadriceps) muscle of the leg in the band, straightening and locking the knee.
- With quadriceps tight, lift the leg in the band slightly and kick forward slowly.
- Return to the starting position slowly.
- Complete the movement 12 times.
- Switch legs.
- Perform 1-3 times daily as directed by your physical therapist.
PRIMARY Standing Single-Leg Hip Extension With Resistance
This exercise is a weight-bearing next step from the prone stomach-lying leg raises from Phase 1. Single-leg standing hip extensions challenge the stability of your stationary leg and the strength of the hip extensors of your moving leg.
- Loop or tie an exercise band around a secure object such as a table leg.
- Place one ankle inside the loop and step back until there is slight tension on the band.
- Stand tall. Tighten the front thigh (quadriceps) muscle of the leg inside the band, straightening and locking the knee.
- With your quadriceps tight, lift the leg in the band slightly and kick forward slowly.
- Return slowly to the starting position.
- Complete the movement 12 times.
- Switch legs.
- Perform one to three times daily as directed by your physical therapist.
PRIMARY Standing Single-LEg Hip Abduction With Resistance
This is a weight-bearing next step from side-lying leg raises. Standing single-leg hip abduction challenges your stability and hip strength on the stationary leg and the strength of your hip abductors of the moving leg.
- Loop or tie an exercise band around a secure object such as a table leg.
- Place one ankle inside the loop and step to the side until there is slight tension on the band.
- Lift the left leg slightly and move it out to the side. Keep the knee in the band straight.
- Stand tall. Avoid the temptation to lean your body to the side.
- Return slowly to the starting position.
- Complete the movement 12 times.
- Switch to the other leg.
- Perform one to three times daily as directed by your physical therapist.
PRIMARY Double-Leg Quarter Squats
Double-leg quarter squats provide an important transition to strengthen further your quadriceps, gluteal muscles and hamstrings. They also enable you to improve weight-bearing movements through your knees.
There are multiple important steps to this exercise. Avoid having non-targeted muscles perform the workload (called compensation). This will help you achieve your goals more efficiently.
- Stand with your feet shoulder-width apart.
- Place your hands on your waist.
- Bend slightly at your hips, then at your knees.
- Lower your buttocks down about six inches as if you were going to sit in a chair.
- Straighten your legs and hips to return to standing.
- Keep your weight evenly on both legs. Avoid shifting weight to the nonoperative side.
- Keep your trunk straight and limit any tilt forward. Aim to keep the middle part of your knees over your second and third toes without letting your knees go forward beyond your toes.
You might find it useful to do these squats in front of a mirror. This will show you whether you’re keeping weight evenly on each leg.
PRIMARY Double-Leg Heel Raises (calf press)
This exercise will strengthen your calves. This improves your ability to walk, jump and later in your rehab, run.
- Stand with your feet shoulder-width apart at the edge of a table or counter for support.
- Lift your heels slowly over two seconds to rise onto both toes. Keep your weight evenly on both legs.
- Hold for a short period, then lower slowly for four seconds.
- Repeat two sets of 12 one time per day.
- Make sure your motion is vertical. Do not rock your body. Use your arms only to stay in position, not to lift.
PRIMARY SiNGLE-LEG Heel Raises
This exercise improves the strength of your calves. This improves your ability to walk, jump and, later in your rehabilitation, run.
- Stand with your hands on a solid surface and your feet shoulder-width apart.
- Lift and keep the foot of your non-surgical leg off the ground.
- Rise slightly onto the front of the foot and toes of your surgical leg.
- Keeping your toes on the ground, raise the heel of your surgical leg using a 2-second count, then lower using a 4-second count.
- Move straight up and down. Don’t rock forward. Don’t use your arms to lift.
- Complete this exercise 12 times, two times per day.
PRIMARY Standing Anterior Reach
Standing anterior reach improves the stability and strength of your stationary leg.
- Stand straight with your hands on or just in front of your lower abdomen.
- Bend one knee as you reach the other foot forward as far as you can under control.
- Lightly touch your heel down for added stability.
- Return to standing straight.
- Complete the movement 12 times. Moving slowly increases the benefit.
- Switch legs.
- Perform one to three times daily as directed.
PRIMARY Standing Hip Hinge
This body-weight exercise improves your single-leg stability and hip extensor strength. As your strength improves, you can hold a small weight when advised by your physical therapist.
- Balance on one leg with the knee slightly bent.
- Keep the other leg straight.
- Hinge forward at the hips, bringing your torso down toward the ground until you feel a slight stretch in your hamstrings.
- Allow your straight leg to lift up behind you.
- Keep your low back vertical. Do not bend forward.
- Return to the starting position slowly.
- Complete 12 times.
- Switch to the other leg.
- Perform one to three times daily as directed by your physical therapist.
PRIMARY Side Step Up
This exercise develops strength and stability. This is key for developing base lateral movement skill.
- Stand beside a two- to six-inch step, stable board or platform.
- Place the nearest foot up on the step.
- Lift yourself up on that foot, putting your weight through the heel.
- At the same time, lift your opposite knee in the air to 90 degrees.
- Return to the starting position slowly.
- Step completely off the step.
PRIMARY Patellar mobilization (Medial and Lateral)
Patellar mobilization helps you more easily bend and straighten your knee. It also helps reduce knee tightness symptoms. All steps are critical.
- Make sure your operative knee is straight and relaxed.
- Use your thumb and index finger to find the edges of your kneecap.
- Place your thumb on one side on your kneecap and index finger on the other side.
- Move your kneecap firmly side to side. Make every effort to not irritate the skin or any incisions.
- Move it side to side 20 times.
Phase 2 Functional Exercises
Was This Content Helpful?

Share via: